Tuesday, November 2, 2010
Tutorial References
http://www.gd-experience.eu/index.php?section=2&category=7&offset=4
Tutorial Brief
I have chosen this topic for a couple of reasons. Firstly, these techniques proved invaluable to me during experiment 2, and what I achieved in my porosity lens can be largely attributed to them. I was surprised at the ease with which some very interesting events could be created with just a small bit of fundamental knowledge, and therefore I think it is appropriate to produce a clear, easy to follow tutorial outlining this information. My second reason builds out of the first - the fact that there are surprisingly few good tutorials on these subjects out there, and in the case of how to set the proximity trigger to respond to an AI character, there is absolutely nothing. While researching for experiment 2, I searched long and hard for a solution to this problem only to come up with nothing. I eventually worked out how to do it, and it's really very simple, but I feel the need to put the information out there in order to save other people the time it took me to figure it out.
Sketchup Model
Explorations
1st Draft
Combining AI with Proximity Triggers
Developing Sketch Installation


Porosity Lens Brief
My lens will use two different forms of lighting representation. The first will be multiple trails of lights to record human activity in an area, thus demonstrating both how people are moving and where the greatest concentration of activity is. The second will involve gradations of brightness to indicate where the most activity has taken place. To achieve the first effect, multiple AI characters will be deployed throughout the station, and their paths will be recorded using proximity triggers to switch on small lights of varying colours. These lights will remain glowing for a certain amount of time after the characters have passed through them so that a clear path can be discerned.
The second representation will be achieved similarly, but instead of delaying the switching off of the lights, they will remain on once triggered, with new lights being added over the top as more people pass through the area over time. In this way, the areas of the station that received the most human traffic will glow the brightest.
Videos Demonstrating Mastery of Nodes
This video shows me using a series of proximity triggers to set off a sequential chain of lights. I have also posted the flow graph of this.

Time:Delay -
In this video I pass through a chain off proximity triggers attached to light switches. I have altered the time it takes each light to turn off after I pass through it, so that the first light I activate is actually the last light to turn off, and the last light I activate is the first to turn off.
AI:FollowPathSpeedStance -
The video below shows the node after it has been used to assign an AI character to a designated path. The video also shows the character in both a relaxed walk and an alert run. The flowgraph is also below.

Three Nodes SWOT Analysis
Strengths:
Easy to use and versatile - can be used to create an extensive variety of effects.
Weaknesses:
A character needs to physically walk through a proximity trigger - remote activation is not an option, which can be limiting.
Opportunities:
This node can be used for many things, including turning on lights and opening doors. The ability to activate an event simply by passing through a designated area is quite powerful, and will be perfect for my intentions of representing movement through visual effects.
Threats:
Care must be taken when setting proximity triggers, especially when you have multiple triggers in the same area, as you do not want the player or other characters accidentally triggering the wrong events.
AI:FollowPathSpeedStance -
Strengths:
Excellent tool for controlling the movement of AI characters. It is relatively easy to use, and can also be used to manipulate the alertness of the character, as well as his speed of travel. With these options, this node makes it easy to produce mobile enemies, or direct characters to perform other tasks to suit your purposes.
Weaknesses:
The node is only applicable when used in conjunction with an AI path, which can be limited in terms of movement. It is also only really suitable for moving an AI character from one spot to another, and therefore as a stand alone node, there are only so many things you can use it for.
Opportunities:
As stated above, this node is perfect for moving AI characters along a path, and therefore it opens up a whole raft of opportunities to create events or effects that build upon the movement of AI. A few possibilities could include patrolling enemies, AI characters turning on lights or opening doors, and enemies taking cover.
Threats:
The actual flow graph scripting for this node can get very complicated once you move beyond the basics, and the Sandbox editor has a few obscure features that can cause problems for generating AI navigation if you don't know what you are doing (for example, small boxes that need to be checked or unchecked that can frustratingly cause your AI to be completely unresponsive).
Time:Delay -
Strengths:
A very simple node that is nevertheless very useful in certain situations, with the ability to delay an event either finishing or beginning.
Weaknesses:
The node is not very useful as a stand alone tool, and is limited to dealing with the timing of certain events. It therefore has a very specialised role, that is perfect in some circumstances but useless in others.
Opportunities:
Time:Delay creates many opportunities within Sandbox 2. Attached to a proximity trigger, it can be used to delay the event that trigger is associated with. For example, a light may take a designated amount of time to turn on once activated, or a door might wait several seconds to close after being opened. Similarly, an AI character could be programmed to delay a certain action.
Threats:
As stated above, Time:Delay is very limited in what it can do, and may have no use.
Thursday, September 9, 2010
EXP 2 - Three Nodes Research
Entity:Proximity Trigger
AI:FollowPathSpeedStance
Time:Delay
These of course will not be the only nodes used in my porosity lens, however I chose to focus on these three as they are the most integral and fundamental to what I hope to achieve.
Entity:Proximity Trigger -
This node acts as a switch, activating a specified event when a character enters its range. This is a very powerful node, with limitless possibilities, and it can easily be combined with other nodes to enhance its effects. Some examples of its uses include triggering hud effects such as blood splatters and frost, turning lights on and off, and opening doors.
Here is what it looks like in a flowgraph:

Here is a description of each of the node's properties, courtesy of Crymod Wiki (http://wiki.crymod.com/index.php/Sandbox_ObjectsEntityTriggers#Proximity_Trigger):

ActivateWithUseButton:
Specifies if the trigger is activated by pressing use
DimX:
Specifies how big the trigger is (x-axis)
DimY:
Specifies how big the trigger is (y-axis)
DimZ:
Specifies how big the trigger is (z-axis)
Enabled:
Specifies if the trigger can be activated or not.
EnterDelay:
Sets up a delay (in seconds) before the enter node of the trigger is activated.
ExitDelay:
Sets up a delay (in seconds) before the exit node of the trigger is activated.
InvehicleOnly:
Sets up that the trigger can only be activated when player is inside vehicle.
KillOnTrigger:
Disables the trigger when it has been activated.
OnlyAI:
Sets the trigger to be only triggerable by AI entities.
OnlyMyPlayer:
Sets the trigger to be only triggerable by the my player entity.
OnlyOneEntity:
Sets the trigger to be only triggerable by one entity (first one who triggers it has to leave it in order to be triggerable again)
OnlyPlayer:
Sets the trigger to be only triggerable by player entities.
OnlySelectedEntity:
Sets the trigger to be only triggerable by the entity with the name specified in this field.
OnlySpecialAI:
Sets the trigger to be only triggerable by the special AI entities.
PlaySequence:
Plays the trackview sequence with the name specified in here.
ReferenceName:
Here a reference name for the trigger can be entered.
ScriptCommand:
Executes a script command when the trigger has been activated
TextInstruction:
Prints a text on the hud when the trigger has been activated.
TriggerOnce:
Disables the trigger after it has been triggered once.
Here is a page from Crymod Wiki that demonstrates a few uses of the proximity trigger regarding image nodes. The triggers are used to enable and disable effects such as rain drops, frost, blood splatters and filter blur:
http://wiki.crymod.com/index.php/Sandbox_RefFlowgraphImageNodes
Lights will feature heavily in my porosity lens, and I will most definitely use proximity triggers in conjunction with them. Here is a tutorial on youtube showing how to use triggers to turn lights on and off:
http://www.youtube.com/watch?v=vO5gOBoue7Y
Here is a video of my first attempt at a light switch. There are two lights, and a 10 second delay is attached, meaning the lights stay on for that amount of time after the trigger has been enabled:
Here is the flowgraph for that trigger:

AI:FollowPathSpeedStance -
There wasn't that much information on this node out there, but basically it is pivotal in controlling AI characters. It is used to link an AI character to a designated path for it to follow, and can also be used to set the speed and alertness with which that character travels. The node is easy to use, and is obviously a vital and useful tool, particularly when you want to send different characters to different locations at once, or have them perform different tasks. Here is what it looks like in a flowgraph:

Here are a couple of tutorials that deal with setting up AI characters to patrol between points. The first one also deals with random selection of routes by AI, something that I might find particularly useful for my experiment:
http://www.moddb.com/groups/cryengine-2-developers/tutorials/cryengine-flowgraph-tutorial
http://www.gd-experience.eu/index.php?section=2&category=7&offset=4
Time:Delay -
This node is useful for extending the duration of a particular effect for a specific amount of time. As I will be using lighting to track movement, this could be particularly useful for my purposes. Delaying the fading of particular lights will allow for the paths of certain units to remain highlighted. Here it is in a flowgraph:

The potential of this node regarding lights can be seen in my light switch video above.
Sunday, August 29, 2010
Filefront Files
To move platforms:
Start platform 1: "p"
Start platform 2: "o"
Sketchup Model


Mode For Final Machinima
Sony Vegas Trial - Observational Mode
Here is a rough video linking together a shot of my moving platforms and ramps, with a shot of one of my explosions. Through this clip I became more familiar with some of Vegas's features, such as transitions, soundtracks, speed settings and reverse. Apologies for the hud features that remain in this clip, they will be gone in my final submission.
This clip to me features predominantly elements of the observational mode of documentary. There is no interaction between film-maker and environment, with the camera remaining unobtrusive and unbiased, and simply letting events unfold.
Saturday, August 28, 2010
Explosion Trial 2
Explosion Trial 1
Experimenting With Explosions - My Method
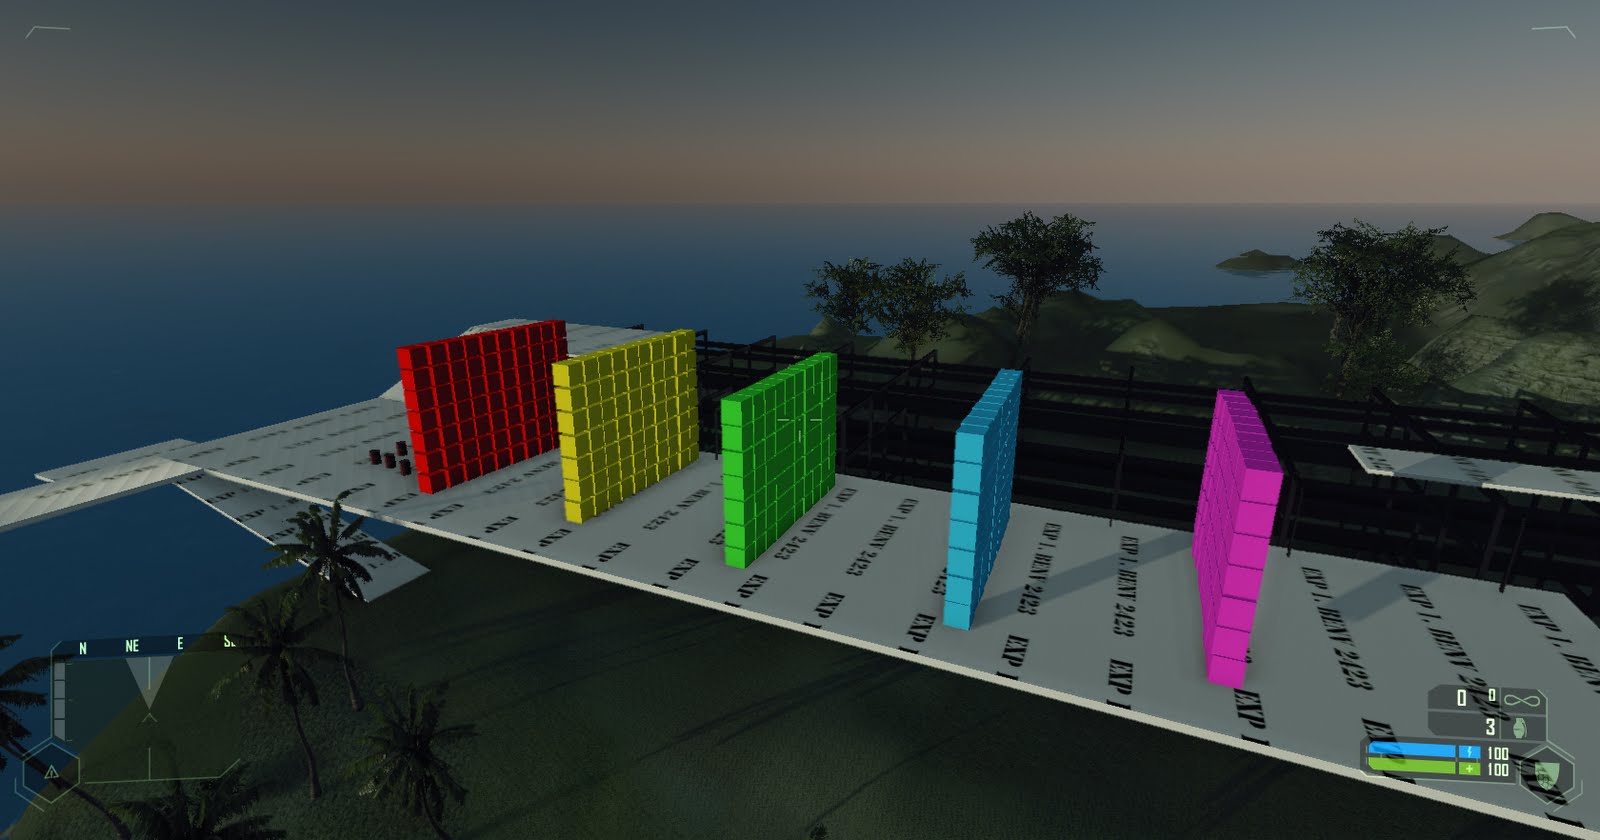
As stated in my hypothesis, I am seeking to prove that the lower the porosity of a group of objects, the more force they will generate if blown up. To test this theory, I will detonate groups of objects, where the objects within each group are spaced at differing intervals from eachother. So in one detonation, the objects will be tightly clustered together, and in successive detonations, they will be spaced wider and wider apart.
To test the force generated by each explosion, I will set up colour coded walls of cubes at measured intervals along the edge of the train station. The stronger the blast, the more walls will be knocked over.


