Entity:Proximity Trigger
AI:FollowPathSpeedStance
Time:Delay
These of course will not be the only nodes used in my porosity lens, however I chose to focus on these three as they are the most integral and fundamental to what I hope to achieve.
Entity:Proximity Trigger -
This node acts as a switch, activating a specified event when a character enters its range. This is a very powerful node, with limitless possibilities, and it can easily be combined with other nodes to enhance its effects. Some examples of its uses include triggering hud effects such as blood splatters and frost, turning lights on and off, and opening doors.
Here is what it looks like in a flowgraph:

Here is a description of each of the node's properties, courtesy of Crymod Wiki (http://wiki.crymod.com/index.php/Sandbox_ObjectsEntityTriggers#Proximity_Trigger):

ActivateWithUseButton:
Specifies if the trigger is activated by pressing use
DimX:
Specifies how big the trigger is (x-axis)
DimY:
Specifies how big the trigger is (y-axis)
DimZ:
Specifies how big the trigger is (z-axis)
Enabled:
Specifies if the trigger can be activated or not.
EnterDelay:
Sets up a delay (in seconds) before the enter node of the trigger is activated.
ExitDelay:
Sets up a delay (in seconds) before the exit node of the trigger is activated.
InvehicleOnly:
Sets up that the trigger can only be activated when player is inside vehicle.
KillOnTrigger:
Disables the trigger when it has been activated.
OnlyAI:
Sets the trigger to be only triggerable by AI entities.
OnlyMyPlayer:
Sets the trigger to be only triggerable by the my player entity.
OnlyOneEntity:
Sets the trigger to be only triggerable by one entity (first one who triggers it has to leave it in order to be triggerable again)
OnlyPlayer:
Sets the trigger to be only triggerable by player entities.
OnlySelectedEntity:
Sets the trigger to be only triggerable by the entity with the name specified in this field.
OnlySpecialAI:
Sets the trigger to be only triggerable by the special AI entities.
PlaySequence:
Plays the trackview sequence with the name specified in here.
ReferenceName:
Here a reference name for the trigger can be entered.
ScriptCommand:
Executes a script command when the trigger has been activated
TextInstruction:
Prints a text on the hud when the trigger has been activated.
TriggerOnce:
Disables the trigger after it has been triggered once.
Here is a page from Crymod Wiki that demonstrates a few uses of the proximity trigger regarding image nodes. The triggers are used to enable and disable effects such as rain drops, frost, blood splatters and filter blur:
http://wiki.crymod.com/index.php/Sandbox_RefFlowgraphImageNodes
Lights will feature heavily in my porosity lens, and I will most definitely use proximity triggers in conjunction with them. Here is a tutorial on youtube showing how to use triggers to turn lights on and off:
http://www.youtube.com/watch?v=vO5gOBoue7Y
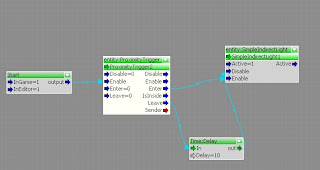
Here is a video of my first attempt at a light switch. There are two lights, and a 10 second delay is attached, meaning the lights stay on for that amount of time after the trigger has been enabled:
Here is the flowgraph for that trigger:

AI:FollowPathSpeedStance -
There wasn't that much information on this node out there, but basically it is pivotal in controlling AI characters. It is used to link an AI character to a designated path for it to follow, and can also be used to set the speed and alertness with which that character travels. The node is easy to use, and is obviously a vital and useful tool, particularly when you want to send different characters to different locations at once, or have them perform different tasks. Here is what it looks like in a flowgraph:

Here are a couple of tutorials that deal with setting up AI characters to patrol between points. The first one also deals with random selection of routes by AI, something that I might find particularly useful for my experiment:
http://www.moddb.com/groups/cryengine-2-developers/tutorials/cryengine-flowgraph-tutorial
http://www.gd-experience.eu/index.php?section=2&category=7&offset=4
Time:Delay -
This node is useful for extending the duration of a particular effect for a specific amount of time. As I will be using lighting to track movement, this could be particularly useful for my purposes. Delaying the fading of particular lights will allow for the paths of certain units to remain highlighted. Here it is in a flowgraph:

The potential of this node regarding lights can be seen in my light switch video above.